Wednesday 8 May 2013

Displaying 3D Polygon animations.

Displaying 3D Polygon animations

To display 3D Display 3D polygon animations you need a application, API (application programming interface) which actually displays the 3D animation. Some of these are Direct3D and OpenGL. These programs create the shape that will then be displayed on the screen.

The graphics pipeline requires a three dimensional object to be shown on a two dimensional screen, to do this it gathered information on the vertices or the main control points of the 3D object and crops the 3D model so it only displays what can actually be seen. For example if we have a model of something like a shoe or a television and we are looking at the object from a side angle, the application programing interface will give only the information concerning the side visible of the object and it will then cut out the parts that should not be visible. There are different bits of information provided by the vertex which include its position on the x-y-z coordinates , the texture, reflectivity and the red green blue (RGB) values. The general primitives within a 3D model or 3D graphic are lines and triangles that create the shape and illusion of depth. However there are a few steps that the program does before simply creating and displaying the 3D model or graphic. These are; modelling, lighting, viewing, projction, scan conversion, texturing, shading, viewport transformation and finally the display

Each of these stages has a very important job to create the image that is displayed.

First of all modelling, this stage is where the whole scene is generated using the vertices, edges and faces.

Next the lighting stage, this stage is where the surfaces in the scene are lit accordingly to the position and location of the light sources in the scene.

Then there is the viewing stage, this is where the virtual camera is placed and based on the position of the camera the 3D environment is then transformed into a 3D co-ordinate system.

After the viewing stage there is the projection stage. This stage is where the 3D illusion is created using perspective projection meaning that the more distant objects appear smaller.


The fifth stage is clipping. Clipping is where the objects that are putside of the view will not be generated, this is not needed but helps improve overall performance of rendering.

Once the clipping stage is done the stage after this is viewport transformation. In this stage the co-ordinates are given to the post clip vertices. These co-ordinates will relate to the next stage which is called scan conversion.

In the scan conversion stage, rasterisatiom is used to determine the end pixel values.

When the scan conversion stage is done the individual pixels are given colours depending on their values fiven from the rasterised vertices or from images created to be applied to the specific areas. This stage is the texturing and shading stage.

Then the final stage is the display where the final image of the scene with all the coloured pixels is shown on a 2D screen.

Now once the model is finished a final render will be made which will place all the information together and give the best quality image. The four main ways in which these completed models and environments can be rendered are; Ray casting, Ray tracing, Radiosity and Rasterisation.

Rasterisation - this is where it takes the shapes and information from the scene and creates a raster image (image using pixels) which will then be dispalyed on a TV etc or it can be saved as an image file.

Ray-Casting - this besically sends rays to each pixel and collects information from it such as RGB value and opacity value. From this information it projects an image of the scene which is based upon the perspective of the scene using little effects. This is basically a lower quality of Ray-tracing but however due to this lower quality is it more effcient and less intensive on hardware meaning it is much better for interactive purposes such as video games or 3D animated tours.

Ray-Tracing -This method of rendering is a much more intensive version of the Ray-Casting method. This is because not only does it collect information for pixels but it also replicated lighting, shadows and refractions. Due to this being so intensive it will be a slower process to render meaning it isnt as effcient as Ray-Casting when needed for interactive applications.

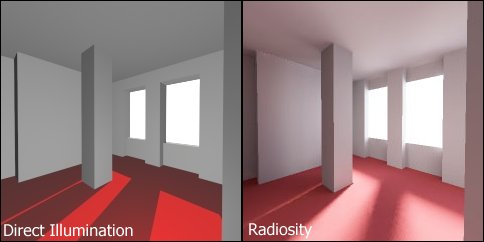
Radiosity - This is used with other rendering techniques and this simulates more realistic lighting as it calculates the passing of the light through a scene and reacts how lighting would for example, it will illuminate an environment with more realistic shadows and lighting levels.


 Now talking about lighting there are 4 different types of light that affects the models and environments. These are; ambient light, diffuse light and speculare light.

First of all, the base colour of the model is often the dull colour meaning that it is quite plane colour on its own and so we can add the other types of lighting to an object.

The next lighting is the diffuse lighting and this again is a darker coloyr usually and adds the general texture to the object.

Then finally we have the specualar light which gives us reflectiveness whether it be high or lower. Textures can also be applied to models and these are basically an image that gets wrapped around the model. Textures can be extremely realistic when you take into account how the texture should behave. eg any transparency or reflectivity, how rough or smooth the object should be. These can all be modified by creating different layers of the texture. For example, first we could put a basic diffuse bitmap on the model (this is basically the texture) but then we can make this look 3D by adding a bump map layer (for example makes a image of a brick wall look more 3D in the sense of the rough textures look clearer and more realistic. We could then also put a specular map on the image its opacity and so on.


Another technique used to make interactive appications that are using all these methods are more effcient is fodding. This method basically has a distance fog on it so that from the camera the polygons in the distance were not as high quality and hazed out unlike the textures closer to the camera, this would then display the polys as the camera got closer.

This method is definately more effienct on hardware and processing speed of the environment and the polygons in the scene.

Shading is another technique that is used to help processing speed etc and there are three main methods of shading this basically generates one colour for each of the polygons in view for example if you have a sphere made up of squared polygons it will look more like a disco ball than a sphere meaning that it looks very unrealistic, however it is quick at processing.

The second method of shading, this is similar to flat shading but rather than it calculating a colour for each poly it creates one for each of the veracities meaning there are a lot cleaner shading however this can actually miss some effects such as specific lighting. This method is particularly fast but as i just said it can still miss effects leading to slight unrealism or not the highest quality.

The final method is phong shading, this is a might more precise approach to that works out vector normals to every vertex which if we use the sphere example again it is more accurate at creating the realistic curve of the sphere. However this means that it has more calculations meaning slower processing speeds when rendering.

The fimnal method of increasing effiency is the level of detail in the models, for example close to the camera a model of a human can be extremely detailed with facial features etc.. hoever move the human model a specific distance and we can change its model to be less detailed but keep some of the main features then if we move the model even further away from the camera we could change the mdoel again so it is a basic outline of a human with slight depth cues


Friday 8 March 2013

3D Constraints


     3D Constraints.
    Even though 3D development software is amazing to use and has given everyone new experiences the limitations still need to be taken into account. 3D software has been ground breaking and a major advantage to many industries as 3D modelling is used in most things now such as film, architecture, animation, gaming, toy bulding and much more. There are also many disadvantages that come with the advantages.

    The first problem that I would like to stress is that even thought the software is fun to use and can create many advantages for people in many businesses, the software that is available is very expensive. Therefore this means not many people can buy this as most software is a ridiculous price for example it can be around £3000 for 3DS Max alone. 
    This is a very expensive thing to buy, not many will be able to afford this. Meaning that it may be only major businesses and companys making films etc that can use this, whereas a normal working person will not be able to afford £3000 for one program. 


    All though Autodesk offer supporting packages such as the support for students that it is free for two years. This is one of the disadvantages of 3D software. You can also get free trials for around 30 days but this will just be a taster to see what the program is like. However there are also free programs that you can download such as Daz 3D but these will not give you the same effect and experience as the more expensive programs.
    The final limitation is that the user is restricted to what the program can do, meaning that the user's creativity is then restricted.

    One of the biggest disadvantages of  3D software is that the rendering time plays a huge part in delaying the production of any 3D production. For major productions such as the work of Pixar who use 3D software they use rendering farms. These and huge warehouses filled with servers and extra support to help render their scenes. It took Pixar 3 years to render Finding Nemo. This then costs companies a lot of their budget as it costs in energy bills but also if the scene is not to the animators expectations then it must be re-done and that is then a waste of months. Also a person who is wanting to render something thereself as big will not have the facilities or equipment to do this therefore taking even longer to render.

    Another major problem is how time consuming it can be to create a good high quality model as it takes a while to get used to all the different tools and settings as there is so many, therefore you need good knowledge about the program. This is why when learning about how to use a new software it will take a while to get used to and get your head around everything. However there are many tutorials available and forums to help you.

    The final limitation of development software is that certain PC specs are needed to be able to use the application. This means spending a lot more money on more materials in order to work the apps. 

3D Development Software

Review the existing 3D development software: software, eg 3D Studio Max, Maya, Lightwave, AutoCAD, Cinema 4D, Mudbox, Zbrush, Softimage|XSI. Also explain the  file formats associated with each application, eg 3ds, .mb, .lwo, .C4d, .dxf, .obj;

3DS Max
3DS Max is a popular 3D program used to develop video games, animation etc. Some companies use 3DS Max in film and television therefore the use of 3DS Max being wide. It provides a workable modeling, animation and rendering solutions.
Max was the first program to get plug-ins to render 3D scenes directly into Flash animations. There are even several add-on rendering systems that give Max more powerful raytracing and global illumination capabilities, although the cost of adding high-end rendering capabilities to Max can make it as expensive as a more powerful animation package such as SoftimageXSI. 

MayaMaya is used in the TV industry for shows like Lost, motion films like Avatar, Rise of the Planet of the Apes and in the gaming industry for games like Medal of Honor and Resistance. Autodesk Maya is a 3D animation and modeling software that is used for effects, rendering  and much more. Using this software can help you create and edit 3D models in various formats. You can animate your models as there is many animation tools. At the end of a 3D model you can also render what you have created as well as rendering a scene to go with it, this is used to create a more realistic look. Maya is a software for 3D digital animation and visual effects.

Lightwave
This software is a very popular choice that is used for mostly television and video production. It is also popular as it is an easy software. However the down side is that the modeling lacks associativity, which makes some types of revisions much slower and does not allow many undo steps, which can result in poorer quality work and may take longer to do. It does perform well, is simple to learn, and experienced users can get high-quality work done with it. Also the animation still has a lot of catching up to do with Maya or Softimage. Lightwave's renderer is a well regarded raytracer, which also includes Image Based Lighting and global illumination support. Lightwave's renderer has been used for many commercials and TV programs. Very few of the leading film studios use Lightwave, but it is often used by smaller companies contributing opening title sequences, monitor screen graphics, and other smaller parts of a film's CGI. 

AutoCADAutoCAD is a software application for computer-aided design (CAD) and drafting. The software supports both 2D and 3Dformats. The software is developed and sold by Autodesk. The first release of CAD only used primitive entities, these are things such as: polygons, cirlces, lines, arcs and text. This was used to construct complex objects. However the modern version of the software includes a full set of tools for solid modeling which is easy to use and 3D in which the software’s steep price tag and learning curve is likely to intimidate beginnersAutoCAD LT is the light CAD design software which offers computer 2D drafting and detailing.

Cinema 4D
Cinema 4D  is the latest release 3D motion graphics, visual effects, painting, and rendering software application from MAXON. It is the most popular software among professional 3D animators and motion graphics artists. It has been used for films such as 2012, Iron Man 2, District 9, and Cloudy with a Chance of Meatballs. It has also been used in the MTV Music Awards as well as in many other areas such as architectural modeling, graphic design, science, and engineering.

Mudbox
Autodesk Mudbox is digital sculpting and digital painting software for artists, modellers and texture artists in games, film, television and design. Autodesk mudbox is an all around sculptor or modeler. This means its main purpose is to create monsters, characters, creatures, ect. And use a process called 'painting' to give them colour. It was first used to produce the 2005 Peter Jackson remake of King Kong. With a very simplified interface. Mudbox's primary application is high-resolution digital sculpting, texture painting, and displacement.

Its best feature is the interface however as the software has developed the interface has been slow. 

Features that Mudbox has:

1. Movable 
cameras that can be bookmarked.
2. Models created within the program typically start as a simple polygon mesh that can be manipulated with a variety of different tools.
3. A model can be 
subdivided to increase its resolution and the number of polygons available to sculpt with.
4. 3D 
layers allow the user to store different detail passes, blending them with multiplier sliders and layer masks. Using layers the user is able to sculpt and mould their 3D model without making permanent changes.

ZBrush
ZBrush is a digital sculpting tool that combines 3D/2.5D modeling, texturing and painting This software offers tools and new features such as GoZ, ShadowBox, Spotlight, PolyPainting Layers, Timeline, and ZSketch. These new tools are useful for sculpting 3D modelers such as gaming, animation, toy design etc. Zbrush is a virtual sculpting tool. Artists use it to create very detailed sculpted organic objects, like character heads.

File Formats3ds Max General file (.3ds)3ds Max Character (.chr)Skin Envelopes (.env, .envASCII)UVW coordinates (.uvw)Blender (.blend)Cinema 4D (.c4d)Lightwave Object (.lwo)Lightwave Scene (.lws)Luxology Modo (software) file (.lxo)Autodesk Maya ASCII File (.ma)Autodesk Maya Binary File (.mb)AutoCAD general file (.dxf)Organized machine code file (.obj)Material Library (.mat)

Wednesday 28 November 2012

Box Modelling a monitor

Box modelling a monitorI had followed a tuturial to help me box model a monitor for a PC in 3DS Max. In this tutorial I am going to show you how I have done this.

First of all I went to the command panel which is located on the right hand side and went to the create tab, clicked on the box tab, then clicked on the keyboard entry. When I had clicked on that I then changed the length and width to 80.00 cm and the height to 5.0 cm. Before I clicked on create I went to Customise tab which is located at the top of the programme and went to unit setup and changed the metric from metres to centimetres. I then went back and clicked create and a box appeared on screen like so.


I then right clicked on the box and converted it to an editable poly and then straight away you can see that the command panel has changed as the sub object level has appeared. I then clicked on vertex and as they were small to see, I again went to customize, preferences, viewports, then went to show vertices as dots and changed it from 2 to 4. When I had done this I clicked on the polygon tab and clicked on the top of the box, and then went over to slice plane.


When I had done this I clicked on the edge modelling function and then selected one edge. As I wanted to select two edges I held down control and clicked the opposite edge. This allows me to choose multiple edges.


I then clicked on ignore backfacing on the command panel which makes sure I dont accidentally click any other edges. I then right clicked and pressed connect and made sure I used two connections, to do this you right click and where it says connect click on the little square which is on the left of it, when you have done this change the segments to 2, change the pinch to -62 and the slide to 523. When I had clicked the tick I made sure i pressed f4 so that i could see the wire frame and see the slice that I had just done.

When I clicked on the tick I then clicked on the sub object polygon, and then selected the poly in the middle.


I then clicked extrude which is in the command panel and dragged the selected poly up. Then using the move tool I moved the extruded poly forward so that it was on a slant.


Monday 29 October 2012

Explain the following Mesh construction techniques: box modelling; extrusion modelling; using common primitives, e.g. cubes, pyramids, cylinders, spheres.


Box modelling is when the user is able to locate the create section and make a box here you are able to edit the parameters and the amount of segments the box then has. this can be made very easily by dragging and propping in any of the perspectives.
Extrusion modelling is where the shape has been made and now it needs to be extended on one of its faces or vertices. By selecting extrude and inclining the amount it makes the shape extend and extrude in the selected area. 

Mesh's are multiple shapes together that may have been edited, placed together in order to form an overall shape.
The definition of a spline is a 2D object with vertices and segments. Once made i was then able to edit the shape of the spline

Mesh Construction Using Splines
First I made a spline. To create this I clicked on the line tab, I created it in the top viewport. To create it you click and drag, to release you right click. 

I then clicked onto the vertex tab and clicked onto the middle dot and dragged it upwards on the z axis. So that it then looks like a triangle or the top of a roof.


When I had done that I then cloned that line by holding the shift key and dragging. When I released it a tab came up, I changed it to instance. I changed it to instance because if I want to change any of the lines in any way it will change the one that is duplicated in the same way.


I then deleted the clone I did and made another but this time I changed it to copy. I changed the colour to pink. I then made another clone and changed the colour to green so that I had 3 splines altogether. As these are copies I can change them all so that they look different. When I change them they wont all change the same to the one that has been changed.

I then made a surface, to do this I had to attach the three splines together. I clicked onto the attach function which is located on the right hand side in the command panel under Geometry. When all three splines have been selected I then turned off the attach button.

After this i used the cross section tool to join the splines together to create the base for my surface. After this i then used the modifier 'surface' tool. this then fills in the planes to create the surface.

I used the sub objects spline level and selected all the vertices. From here i was able to move them and then show the end result using the simple tool on the right hand side known as show end result. But, with only 3 vertices we don't have much definition in the shape. So we can change to besire which gives us a new level of curvature  but still not many due to lack of sub divisions.

In order to gain more control i added an edit poly modifier to control more, this then expands into vertex, edge, border, polygon and element. When dealing with a spline it is called a segment, but when dealing with a poly its called an edge. Border is a function that if a section has been cut out border then follows those edges and using the cap tool you are able to fill in the gap.

The element function is the whole object you are dealing with. After we applied a Mesh Smooth modifier, this smoothed out the shape and using the ireations tool i was able to decide by how much it would be smoothed out.

Now I was able too look back and see the progress made. First i made a line, then a surface, then an editable poly for more freedom and finally a mesh smooth. I was able to step backwards to line to control the splines but it gives us first a warning notice that the effects may be undesirable. Once OK was clicked you were able to move the vertices along thus breaking the surface. But if i grab two vertices together i can control it. When making another spline i can easily use the smooth and this edits the tangent in and out and can use besire to increase or decrease curvature.


Wednesday 24 October 2012

3DS Max

3DS Max
First I opened 3DS Max and created a blank scene. In this screenshot it is showing you an Ngon and a open arc. I did this by clicking onto the create tab then clicking onto the shapes tab. This then showed me more shapes such as arc, egg, star etc. I clicked onto arc and created the open arc as you click once and drag then on the second click it creates the open arc which is also called an open spline. I then created the Ngon after.


In this next screen shot I created a donut which involves two splines. 


After that I created a star and a helix. A helix is a open spline.


I then pressed control and Z to delete all of the shapes I had created. I then went to customize at the top then clicked on preferences to change how many levels I can undo whilst clicking control and Z. This screenshot is going to show you what I did.


The next thing I did was to create an open spline line. I did this in one of the authographic viewports and sometimes it can create problems if you dont. To create this I clicked on the line tab, I created it in the top viewport. To create it you click and drag, to release you right click. After I had done this I then went to see how this spline is constructed. To do this I made sure I was still cliked onto the line, I then clicked onto the modify tab which is next to create. Where it says line it has a small '+' next to it, I clicked on this and 3 options came up; Vertex, segment and spline. When I clicked onto vertex I could see that altogether I had 3, i had 2 segments which are connecting the vertexes together and I have a subobject spline which selects the whole spline.


I then clicked onto the vertex tab and clicked onto the middle dot and dragged it upwards on the z axis. So that it then looks like a triangle or the top of a roof.


When I had done that I then cloned that line by holding the shift key and dragging. When I released it a tab came up, I changed it to instance. I changed it to instance because if I want to change any of the lines in any way it will change the one that is duplicated in the same way.


I then deleted the clone I did and made another but this time I changed it to copy. I changed the colour to pink. I then made another clone and changed the colour to green so that I had 3 splines altogether. As these are copies I can change them all so that they look different. When I change them they wont all change the same to the one that has been changed.

I then made a surface, to do this I had to attach the three splines together. I clicked onto the attach function which is located on the right hand side in the command panel under Geometry. When all three splines have been selected I then turned off the attach button.


Thursday 18 October 2012

Geometric terms


Examine and explain the following Geometric terms: vertices; lines; curves; edge; polygons; element; face; primitives; meshes; wire frame; surfaces.


Cartesian Co-ordinates
The Cartesian Co-ordinates were created by Rene Descartes, who is a French philosopher and mathematician, in which helped him to create the Cartesian Co-ordinates which is a system of plotting in space. There are certain axis that are used in this system which are X,Y which are the very first axis and then Z which was later added. 
The X axis is horizontal and the Y is vertical. Rene became and is more known for his saying 'I think, therefor I am'.The Z axis is to measure depth. This is for three dimensional view. So following the pattern before with X,Y, the co-ordinates for this is X,Y,Z. 3DS max is a good example of programs that use this. In this program they have four different views from which you can see your creation and help you to see it at all different angles. The views are: Top view port, front view port, left view port and perspective view port. The view using only two axis are called Orthographic view. You can see these view ports in the picture below.


3DS Max
In 3DS Max there is a command panel which is located on the right side of the screen and a menu panel which is located on the top of the screen. This picture is showing the command and menu panel.


In the command panel you can find: Create, Modify, Hierachy, Motion, Display, Utilities. The two main tabs used are create and modify which is shown below.

To start  select the create tab and make a shape, such as a box, cylinder etc. After deselecting, click on the Modify tab to change dimensions. In order to orbit the object use ALT and the middle mouse button or simply use the orbit tool. To select and move an object use the select and move tool which is located at the top (menu panel), holding shift whilst doing so enables you to copy an object. Next to that tool is rotate and next to rotate is re-scale. To see the different edge segmentation click F4 and F3 allows view of an objects wire frame.

Then make a parametric primitive cube, we know that is parametric because we are able to modify it's dimensions. The parametric primitive cube is 50x50x50 and in segmentation its 3x3x3. To change its colour we go to the tab which is a square which is coloured, click that and change the colour to purple and then change its name, which is next to where you changed the colour of the shape.


In the red square it is showing you the parameters and segments.

When the cube was changed into an editable poly, it was then able to modify it with their sub objects. These include Vertex, Edge, Border, Polygon, Element. 


Then in edit poly modifier you can smooth vertices using Mesh Smooth. Then you can mold using the sub objects selection level.


VerticesThe vertices are the points which describe the corners and intersections of geometric shapes. Vertices are important as this can make your model look more precise and accurate making it look better and detailed.

Edges
The edges are the lines that make the shape. Edges are joined to vertices. Edges are important as it connects the points together.
FacesA face of a shape is any of the polygons that make up the boundaries of the shape, for example a cube would have 6 faces.
Polygons
Polygons are 2-dimensional. Polygons are important as it creates the faces for the shape and also polygons can help to change the look of shapes and modify it.
Meshes
A mesh is a collection of vertices, edges and faces that make the shape of an object and can be used in 3D modelling.